


One of the first things that confounded me about the Nikon Z6, during my first walkabout with the Japanese manufacturer’s contribution to mirrorless technology* was its propensity for taking photos of my shoes.
It took me a while to figure out that this “surprise” function was part of an otherwise splendid addition to modern cameras: the touchscreen, a technology that we take for granted on our smartphones.
The Nikon Z cameras enable a plethora of functions via the rear LCD touchscreen, including the option of focussing and releasing the shutter. A light touch/lift will do the job — hence, a nice collection of shoe shots. I consulted the manual (I’m strange that way) and disabled the function.
Coming from my introduction to mirrorless technology, the Fujifilm X-Pro2, I was happy to see Nikon had included its version of the “Q” menu, which Nikon labels the “i” menu. These simplified menus contain often-used functions such as white balance, file format and size, ISO and focus settings. They can be modified according to user-preference.
The Nikon i menu options can be operated via the touch screen as well as with the rear multi-selector button.
In practice, I don’t always find the touch screen faster than the multi-selector. Blame my fat fingers. But I have embraced what I see now as the most useful touchscreen functions, particularly for video: touch-focus.
The Z system (Z7, Z6, Z50) provides a number of different focus area settings:
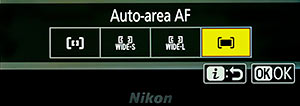
Nikon Z6 Auto-focus area modes
| Single Point AF (AF-S) | For stationary or moving subjects where their exact position in the frame is less precise. |
| Wide Area AF (S) | For stationary or moving subjects; moving subjects that are hard to keep framed using a single point. Use for areas wider than Single Point AF. |
| Wide Area AF (L) | For capturing stationary or moving subjects; moving subjects that are hard to keep framed using a single point. Use this for areas wider than Wide Area AF (S). |
| Auto Area AF | (with face detection deactivated: custom menu a4) should be used when shooting stationary and moving subjects where faces are not the priority. |
| Auto Area AF | (using subject tracking) is used when photographing moving subjects (including Face Detection during portraits). |
Which can be combined with the following focus modes:
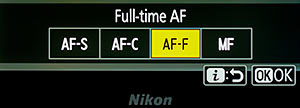
Nikon Z6 Auto-focus modes
| AF-S — Single AF | For stationary subjects |
| AF-C — Continuous AF | For moving subjects |
| AF-F — Full-Time AF | The camera adjusts focus continuously in response to moving subject and changes in composition. |
The Z6 has 273 focus points (231 used for video) spread across its 24.5 megapixel sensor (the 45.7 MP Z7 has 493, with 435 used for video). Notably, focus points reach the edges of the sensor, expanding options for focussing on peripheral subjects. Position is controlled with the sub-selector, AKA joystick.
 I have found by experimentation that, for focussing during video recording, the combination of full time autofocus and auto-area autofocus — the same combo used to successfully auto-track a subject — simplifies the job of “pulling” focus from one subject to another. The latter is accomplished using the touchscreen to “point out” the desired area(s) of focus.
 A feature of the Z system that many reviewers have noted favourably is the separation of photo and movie settings. Quite simply, when you switch from one to the other, settings are preserved. That’s how a true hybrid camera should work and I’m glad Nikon has incorporated and improved that in the Z series cameras.
A host of custom movie settings are accessible via the Custom Settings, sub-menu g. I won’t examine them all here. For the topic at hand we’ll look at g5, AF tracking sensitivity, and g4, AF speed. The latter is most important in achieving the effect we’re looking for: a Hollywood-style focus pull.
Tracking sensitivity controls how quickly focus responds when the chosen subject leaves the focus point or something passes between the subject and the camera in movie mode. Values range between 7 (Low) and 1 (High). The higher the value, the slower the response and the less likely focus is lost on the original subject when something passes between the subject and the camera. The lower the value, the quicker the camera responds to the subject leaving the focus area by shifting focus to a new subject in the same area.
As illustrated in the video above, slowing the AF speed (I used the slowest setting [−5] in the video) produces a nice, smooth focus pull at the touch of a finger. My shoes never looked more cinematic!
*A mirrorless camera does away with the optical mirror of a single-lens reflex (SLR) camera (DSLR in digital) replacing the flapping, vibration-creating unit that must be retracted at the moment of exposure with a tiny TV projector, the sensor itself, monitored by the rear LCD screen and/or electronic viewfinder (EVF). Besides vibration reduction, mirrorless affords several other benefits, with weight and size reduction as a much-appreciated bonus. In theory, auto-focussing can be improved. Z series cameras utilize phase detect autofocus placed directly on the imaging sensor and contrast detect autofocus (which is used when the camera deems it necessary to switch)†. Perhaps the nicest feature is provided by the digital WYSIWYG preview. Unlike the DSLR mirror view, the mirrorless digital preview includes camera adjustments — exposure, white balance, etc. — to give an accurate representation of the final image. Less chimping‡ required. Mind you, despite Fujifilm’s “pure photography” demotion of the rear LCD with the new X-Pro3 and the fact that I come from the era of waiting until the film was developed and printed to see if I “got the shot,” I don’t regard chimping as evil. Besides, I want fast access to the Q/i menu and other camera controls.
†Manufacturer’s description in italics.
‡Checking results on the rear LCD.